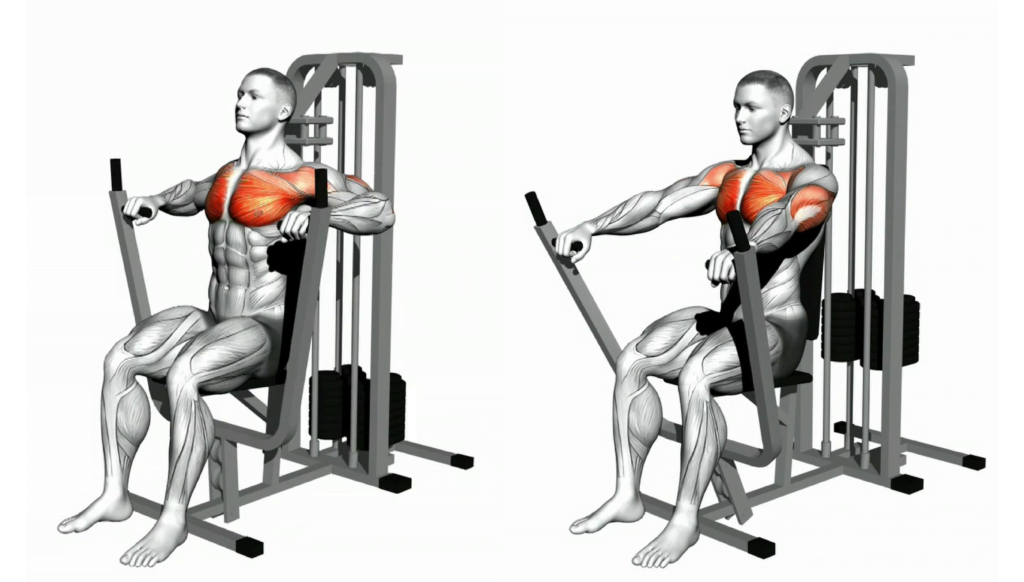
The seated chest press focuses on building strength and muscle mass in the chest (pectoralis major) while also working the front shoulders (anterior deltoids) and triceps. This exercise is excellent for isolating the chest muscles while minimizing the involvement of the lower body and stabilizing muscles.
Setup and Positioning:
1. Machine Setup:
- Locate the seated chest press machine in your gym. This machine typically features a seat with a backrest, handles, and a set of weight plates or a pin-loaded weight stack.
- Adjust the seat so that the handles are at chest height when you’re seated. This is crucial for ensuring proper muscle activation and preventing shoulder strain.
- Adjust the backrest if needed to ensure your back is fully supported and your torso is upright. Your feet should be flat on the floor and shoulder-width apart for stability.
- Select an appropriate weight. Beginners should start with a lighter load to practice form, then gradually increase the weight as strength improves.
2. Seat Position:
- Sit on the machine with your back pressed firmly against the backrest to support your spine and prevent excessive arching.
- Place your feet flat on the floor, roughly shoulder-width apart. Your knees should form a 90-degree angle for stability.
- Grasp the machine’s handles with an overhand grip (palms facing forward). Your arms should be bent at a 90-degree angle, and your elbows should be slightly below your shoulders at the start position.
Execution:
1. Starting Position:
- Core Engagement: Engage your core by pulling your belly button toward your spine. This will stabilize your torso and help maintain good posture during the exercise.
- Ensure that your shoulders are pressed down and back, avoiding any hunching. Keep your chest up and spine neutral.
- Your hands should be gripping the handles with your wrists straight and your elbows bent at a 90-degree angle. This is the starting position.
2. Pressing Movement (Concentric Phase):
- Exhale as you press the handles forward in a smooth, controlled motion. Focus on using your chest muscles to push the weight rather than relying on your arms or shoulders.
- As you extend your arms, ensure that you don’t fully lock your elbows. Your arms should remain slightly bent at the top of the movement to keep tension on the muscles and protect your joints.
- Keep your shoulder blades retracted (squeezed together) throughout the movement to maintain shoulder stability and proper chest engagement.
3. Top Position (Peak Contraction):
- When your arms are fully extended, pause for a brief moment and squeeze your chest muscles to maximize the contraction.
- Avoid overextending your arms or allowing your shoulders to come forward. The movement should be driven by the chest, not the shoulders or lower back.
4. Controlled Return (Eccentric Phase):
- Inhale as you slowly bring the handles back to the starting position. Focus on controlling the movement during the descent to maximize the eccentric contraction in your chest.
- Your elbows should return to the 90-degree angle, and your hands should stop just in front of your chest.
- Ensure that your chest remains lifted, and your shoulders stay down and back as you lower the weight.
5. Repeat:
- Perform the desired number of repetitions while maintaining control and focusing on chest activation throughout each repetition.
Muscles Worked:
Primary Muscle Group:
- Pectoralis Major (Chest): The primary target of the seated chest press is the pectoralis major, which is responsible for pushing movements and bringing the arms toward the midline of the body.
Secondary Muscles:
- Anterior Deltoids (Front Shoulders): The front portion of the shoulder muscles assist in the pressing movement.
- Triceps Brachii: The triceps, located at the back of the upper arm, assist in elbow extension during the pressing motion.
- Serratus Anterior: This muscle, located on the side of the rib cage, helps stabilize the shoulder blades during the movement.
Detailed Form Tips:
Core Engagement and Back Support:
- Keep your core tight throughout the exercise to prevent your lower back from arching. Press your back firmly against the seat for added stability, especially as the weight increases.
Shoulder and Elbow Position:
- Ensure that your shoulders stay back and down, with your chest up. Your elbows should be slightly below shoulder level and bent at a 90-degree angle when you start the movement to avoid overstressing the shoulder joint.
Controlled Movement:
- Perform the exercise with a smooth, controlled pace. Avoid jerky or rapid movements, especially during the lowering phase, to keep tension on the chest and avoid injury.
Range of Motion:
- Don’t fully extend your elbows at the top of the movement. Keep a slight bend to maintain tension in the muscles and protect the joints.
- Return to the starting position with your elbows bent at 90 degrees, but avoid letting the weight rest. Keep tension on your muscles throughout the entire set.
Breathing Technique:
- Exhale as you press the handles forward and inhale as you bring them back to the starting position. Proper breathing helps engage the core and maintain control during the movement.
Common Mistakes to Avoid:
Arching the Back:
- Arching your lower back can lead to strain and injury. Keep your back pressed against the seat and engage your core to maintain proper posture.
Using Momentum:
- Using momentum to push the handles forward reduces the effectiveness of the exercise and increases the risk of injury. Focus on a slow, controlled movement to fully engage the chest muscles.
Letting Shoulders Roll Forward:
- Allowing your shoulders to round forward during the movement shifts tension away from the chest and can cause shoulder strain. Keep your shoulder blades retracted (squeezed together) throughout the entire movement.
Locking the Elbows:
- Avoid fully locking your elbows at the top of the movement, as this reduces tension on the muscles and places stress on the joints.
Too Much Weight:
- Using excessive weight can compromise form and lead to injury. Choose a weight that allows you to perform the exercise with proper form for the entire set.
Progressions and Variations:
Single-Arm Chest Press:
- Perform the exercise using one arm at a time. This variation helps correct muscle imbalances and increases core engagement as your body stabilizes during the unilateral movement.
Increase Weight or Reps:
- To make the exercise more challenging, gradually increase the weight as your chest and supporting muscles become stronger. Alternatively, increase the number of repetitions or sets to improve endurance.
Incline Seated Chest Press:
- Some machines allow for an incline position, which shifts more of the focus onto the upper portion of the pectoralis major. Adjust the backrest to an incline and perform the press to target the upper chest.
Superset with Push-Ups:
- For a more intense workout, combine the seated chest press with push-ups. This increases the workload on the chest, shoulders, and triceps for a complete upper-body workout.
Seated Cable Chest Press:
- If your gym has a cable machine, you can perform a seated cable chest press. This adds constant tension to the movement, providing a slightly different challenge for the chest muscles.
Sets, Reps, and Rest Periods:
- For Muscle Growth (Hypertrophy): Perform 3-4 sets of 8-12 reps with a moderate to heavy weight.
- For Strength: Perform 4-5 sets of 4-6 reps with a heavier weight, focusing on maximum strength.
- For Endurance: Perform 2-3 sets of 15-20 reps with a lighter weight to increase muscular endurance.
- Rest Periods: Rest 60-90 seconds between sets for hypertrophy, 2-3 minutes for strength, and 30-60 seconds for endurance.
Benefits of the Seated Chest Press:
- Improves Chest Strength: The seated chest press is an effective way to build strength in the pectoral muscles, essential for pushing movements in daily activities and sports.
- Stabilizes Shoulder Joints: By keeping the shoulders in a fixed position, the seated chest press helps stabilize the shoulder joint, reducing the risk of injury during heavy lifting.
